
Process
Each of our textiles is a little bit different, and the process to achieve each one differs accordingly. The steps below aren’t a perfect roadmap, but they will give you some insight into the (many!) joys and intricacies of the natural dye process.

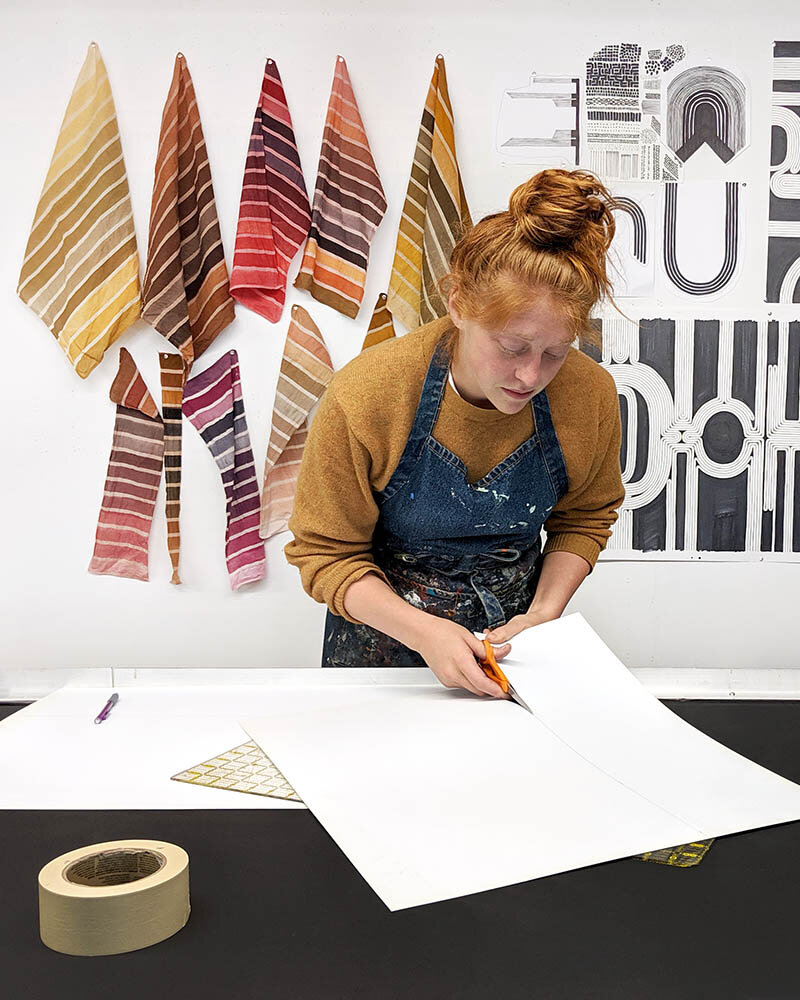
1. Pens & Patterns
Our designs start as pencil sketches that get tweaked, reworked, drawn again, and eventually inked in. Once we’re happy with a pattern or motif, we scan the drawing into a digital file. Sometimes it’s ready to go as is, and other times we use the computer to experiment with different arrangements and scales. Once everything looks just how we want it, we get it printed on a clear sheet of acetate. This sheet becomes the stencil that we use to transfer our design to a screen.

2. Exposing the Screens
The screens we print with are metal frames with a fine fabric mesh stretched tightly across them. We coat each one with a photosensitive emulsion, place the acetate stencil on top, and then expose the screen to light. In the areas where light passes through the clear sheet, the emulsion hardens into a solid layer that blocks the holes in the mesh. In the printed areas of the sheet, the opacity of the pattern blocks the light and the emulsion stays soft. This soft emulsion washes out with water, and print paste is now able to pass through these areas of the mesh. What was a pattern on a sheet of acetate is now a pattern directly on the screen!

3. Scouring
Scouring is a fancy word for cleaning cloth, but it’s appropriate. Instead of simply running our textiles through a wash cycle, we heat them in a big pot (like the giant ones restaurants use for stock!) with soda ash and a gentle textile soap. We boil them for a full hour, stirring frequently, which helps to remove any dirt or grease that may be present and ensure deeper, more even color later on. Then we rinse each piece really, really well and hang them up to dry.
4. Preparing the surface
In order to get a nice, clean pattern when we print, our textiles need to be as flat and square as possible. We start by ironing them to get out any wrinkles from the scouring process, and then we stretch them to size on our print table to keep them taut. Many people use pins to stretch the fabric, but we’ve found that a reusable double-stick tape is a better fit for our process.

5. Mixing the Print Pastes
We print our textiles with different mordants, all of which we buy in powdered form. To make the mordants ready for printing, we mix them up into pastes roughly the consistency of honey. There’s a lot of math involved in this step, and also a very sensitive little scale. If we don’t get the concentration of the ingredients right, it will have a big effect on how our colors come out later.

6. Printing
Print the color and we’re done? Alas, no. Natural dyes can’t bond directly to the cotton fibers of our textiles, so in this step we’re just applying layers of thickened mordants to prepare for dyeing later. These mordant pastes help to build a bridge between the dye and the cloth and bond them tightly together.
We screen print our patterns by hand. Each color you see on a finished piece is a different print layer using a different mordant. For larger pieces, like our scarves, a single print layer might involve two or three precisely aligned screens to achieve the complex patterns along the length of the textile.

7. FixinG The Mordant
At this stage, if we were to put the printed cloth directly into the dye bath, our results would look muddy and uneven. To prevent this, we allow each piece to dry fully, and then we fix the mordant to the cloth with a process called “dunging.” We soak the printed pieces in a bath of chalk, wheat bran, and water. The chalk, which is mildly alkaline, neutralizes the acid in the printed mordants, fixing them to the fibers. Meanwhile, the enzymes in the wheat bran work to dissolve the gum that acted as a thickener in the print paste. Both aspects are important—if the mordants weren’t fixed, they might transfer to other parts of the cloth and pick up dye in unwanted places. And if the gum didn’t dissolve, it would act as a resist and make it difficult for the dye to reach the fibers where the mordant was printed.

8. Preparing the Color
Each of our dyes comes from a different source, and each one requires a slightly different preparation. For some of our yellows, for example, we use the dried leaves, stems, and flowers of the weld plant. Extracting their color is basically boiling a strong weld tea for half an hour! The water that is left behind after we strain out the plant matter is what we use later to dye.
The magenta and purple hues of cochineal, on the other hand, come from a tiny, potent insect. We grind the dried cochineal bugs into a fine powder and boil them to make a deep, concentrated purple, almost like dark wine. We strain this liquid, place the cochineal powder back into the pot, and repeat the boiling and straining process two more times to extract as much dye as possible.

9. The Dye Pot
This is where the rainbow finally comes to life! Our textiles arrive at this step printed with a mordant pattern, but that pattern is often pale or even invisible because the mordants don’t always have a strong color.
We add each piece to a heated dye pot that contains one natural color or a mix of a few. Over the course of a half hour or more, we gently stir the pot and allow the dye to penetrate the fibers of the cloth. When we pull the pieces from the pot, they have soaked up a range of rich shades. For example, a bandana dyed in pomegranate might be a deep charcoal grey where we printed with an iron mordant, lighter yellow where we used a weaker alum mordant, and still plain white where no mordant was printed at all.
If this step sounds first-day-of-summer-break exciting, we can assure you, it is!

10. A Final Wash
We put each textile through one final wash with a gentle soap to make sure that there is no excess dye left in the fabric. When the rinse water runs clear, we know that our pieces have finally made it through the dye process. We dry them, press them, fold them, and tuck them away to wait for the day when they can join you in your home!